
The fourth pattern of my 'representing the 4 seasons' series. Here comes the autumn 6“ square. I got the idea for that square in the 'Gardens of Herrenhausen' where I live nearby and spend much of my free time. This autumn I made some pictures there which I love very much. You can see them further down.
Autumn – this means for me nice coloured leaves and misty mornings. I tried to show these things in this little square.
Pattern uses U.S. Terms

Skill level: medium
Material:
yarn of your choice (aran weight for 6“)
in green (G), sand (S), yellow (Y) and red (R)
5 mm hook
scissors
yarn needle
Abbreviations:
ch – chain
slst – slip stitch
fpsc – front post single crochet
fpdc – front post double crochet
bphdc – back post half double crochet
sc - single crochet
hdc – half double crochet
dc – double crochet
fo – fasten off
st – stitch
sk - skip
bl – back loop
sp - space
Special stitches:
puff: *Yarn over, Insert hook in given stitch/space, yarn over, pull up a long loop through that stitch/space (3 loops on hook)* . Repeat from *-* two more times. You should have 7 loops on the hook (same height for all loops). Yarn over and pull through all 7 loops on your hook, ch1 to close the puff stitch.
front post puff (fppuff): work like a puff, but put the hook into the indicated stitch the same way you do it when working a normal front post stitch
Note: the first stitch of a round is a standing stitch, unless something else is said.
Pattern:
1.
(S) Ch 4, slst to the first ch to close circle. Do not fo.
2.
(S) (2 sc into the circle , ch 2) x4. Slst to first st, fo. (8 sc, 4 ch-2)
3.
(G) Start in any ch- 2- sp. [(Hdc, ch 2, hdc)= corner made, 2 bphdc around the sc] x4 . Slst to first st, fo. (8 hdc, 8 bphdc, 4 ch-2)
4.
(S) Start at any corner. [(Sc, ch 2, sc) = corner made, sk hidden st, sc, dc into rd 2- sc directly below (this one right to a rd 2- corner), back to rd 3: sk the hidden st, sc into next st] x4. Slst to first st, fo. (16 sc, 4 dc, 4 ch-2)
5.
(Y) Start in any corner. [(Dc, ch 2, dc)=corner made, ch 1, puff into the sp directly right to the dc from rd 4, ch 1, puff into the sp directly left to the dc from rd 4, ch 1]x4. Slst to first st, fo. (8 dc, 12 ch-1, 4 ch-2, 8 puff)
6.
(S) Start in any corner. When you work stitches in rd. 4 in this round, it is suggested to work them in front of the rd 5 chain- sts. Start at first corner st. [(Fpsc around rd 5 dc, change to rd 4: {dc, ch 2,dc}, fpsc around rd 5 dc)= corner made, dc into sk st of rd 4, fpsc around puff, fpdc around dc from rd 4, fpsc around puff, dc in sk st from rd 4] x4. Slst to first st, fo. (16 fpsc, 16 dc, 4 fpdc, 4 ch-2)
7.
(R) Start in any corner. [(Dc, ch 2, dc) = corner made, ch 2, puff into the dc before rd 5- puff, fppuff around rd 5- puff, ch 1, fppuff around rd 5- puff, puff into the dc after rd 5- puff, ch 2] x4. Slst to first st, fo. (8 dc, 8 puff, 8 fppuff,4 ch-1,
12 ch-2)
8.
(S) Start in any corner. When you work stitches in rd. 6 in this round, it is suggested to work them in front of the rd 7 chain- stitches. Start at first corner st. [(Fpsc around rd 7 dc, change to rd 6: {dc, ch 2,dc}, fpsc around rd 7 dc)= corner made, 2 dc into sk sts of rd 6, fpsc around next 2 puffs, fpdc around fpdc from rd 6, fpsc around next 2 puffs, 2 dc in sk sts from rd 6] x4. Slst to first st, fo. (24 fpsc, 24 dc, 4 fpdc, 4 ch-2)
9.
(Y) Start in any corner. [(Dc, ch 2, dc) = corner made, ch 5, (fppuff around next two puff sts from rd 7 together) x2, ch 5] x4. Slst to first st, fo. (8 dc, 8 ch-5, 8 fppuff, 4 ch-2)
10.
(S) Start in any corner. When you work stitches in rd. 8 in this round, it is suggested to work them around the rd 9 chain- stitches, including the corners. [(Fpsc around rd 9 dc, change to rd 8: {hdc, ch 2,hdc}, fpsc around rd 9 dc)= corner made, 2 hdc into next sk st of rd 8, hdc in next two rd 8 dc, 2 hdc in next rd 8 dc, fpsc around both puffs together, 2 hdc into next sk st of rd 8, hdc in next two rd 8 dc, 2 hdc in next rd 8 dc] x4. Slst to first st, fo. (12 fpsc, 48 hdc, 4 ch-2)
11.
(G) This is a kind of modified surface- stitch round for forming the leaves. You can just work a combination of slst and ch-1 and have a go on your own. Or you follow these instructions: Start with a slst around a fpsc in the middle of any side. [working down the leaf: ch 1, slst around rd 9 chain (directly left to the fppuff), ch 1, slst around rd 7 chain (directly left to the puff), ch 1, slst around round 5 chain (directly left to the puff), ch 2, slst around rd 4 dc (in the middle of one side), now working counterclockwise : ch 1, 2 slst around rd 3 hdc (the ones of the corner), ch 1, slst around rd 4 dc (in the middle of one side), now working up the next leaf: ch 2, slst around rd 5 chain (directly right to the puff), ch 1, slst around rd 7 chain (directly right to the fppuff) ch 1, slst around rd 9 chain (directly right to the fppuff), ch 1, slst to ffpsc in the middle of one side] x4 (45 slst, 32 ch 1, 8 ch 2)
That's it! Have fun!Copyright Dec. 2020 by Loewenzahm
Special thanks to JustJilly for testing! This was a great help for me!
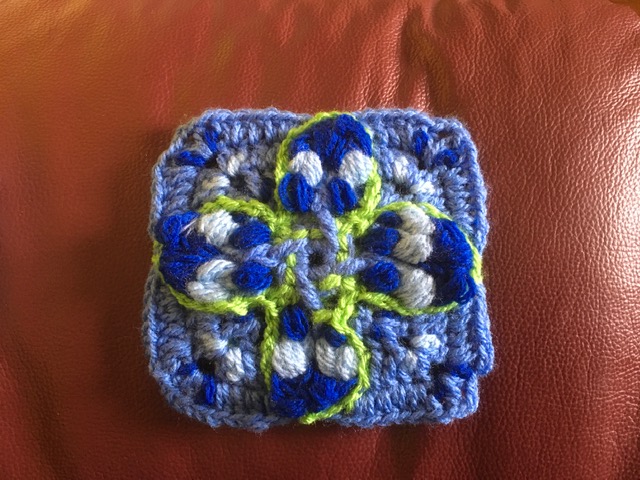 |
| crocheted by JustJilly |
The 'Gardens of Herrenhausen' in autumn


Keine Kommentare:
Kommentar veröffentlichen