

First of all I have to say thanks to all the bamcal team to give me once more the opportunity to design a square for you!
Like last year, I will present you a square for March. I decided to choose again one of the early spring flowers for the center. Last year we had the daffodil. This year it is the spring snowflake ('Märzenbecher' in german, 'Leuconum vernum' is the latin botanical name). I love how they are searching their way to the last bit of snow and bringing back the power of nature in our lives. I tried to interpret that in this 12“ square. Hope you enjoy!

Pattern uses U.S. Terms
Size: 12“ by using aran weight yarn.
Skill level: intermediate
Material:
yarn of your choice (aran weight for 12“)
5 mm hook
scissors
yarn needle
Abbreviations (in alphabetic order):
bpdc – back post double crochet
bphdc – back post half double crochet
bpsc – back post single crochet
ch – chain
dc – double crochet
dc3tog – dc 3 together
fo – fasten off
fpdc – front post double crochet
fphdc – front post half double crochet
fpsc – front post single crochet
fptr – front post treble crochet
hdc – half double crochet
rd - round
sc – single crochet
slst – slip stitch
sk – skip
st – stitch
tr – treble crochet

Special stitches:
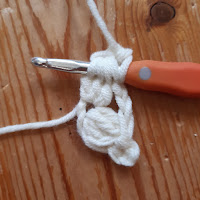
P: picot: ch 3, slst into the top front loops of the stitch directly under it (see picture):
hdc cluster (= hdc, fpdc, hdc together): yarn over, insert hook into next dc, yarn over, pull through (3 loops on the hook), yarn over, hook around sc (similar to the way of a fpdc), yarn over, pull through (5 loops on the hook), yarn over, pull through 2 loops (4 loops on the hook), yarn over, insert hook into next dc, yarn over, pull through (6 loops on the hook), yarn over, pull through all 6 loops.

Note: the first stitch of a round is a standing stitch, unless otherwise stated.
Colour placement: For the original spring snowflake effect, please work Rd 1,6 and 13 in white and Rd 2, 7 and 14 in light green. All other colour placements are up to you and your own creativity ;-)

Pattern:
Colour: white; start with a magic ring. Work into it: (dc3tog, P, ch 2)x6, slst into first dc3tog (not into the P). fo
(6 dc3tog, 6 P, 6 ch-2)
Colour light green, start with two standing bpsc around any dc3tog, pulling the P of round 1 in front of your work; (ch 3, 2 bpsc around next dc3tog)x6, omitting the last 2 bpsc. Slst to first bpsc. fo.
(12 bpsc, 6 ch-3)
Work only around the ch-2 and ch-3 of rd 1 and 2 together. Sk all other st. Start in any ch space: [(hdc, ch 1, hdc, ch 1, hdc) into one ch space, ch 1]x6. Slst to first hdc. fo. (18 hdc, 18 ch-1)
Work only in ch spaces: 2 sc in each ch-1 space. Slst to first sc. fo. (36 sc)
This is a squaring round. Start with your first corner, work this corner in a sc directly above the central hdc of any 3 hdc group of rd 3: [(dc, ch 2, dc) = corner made, bpdc around next st, bphdc, 4 bpsc, bphdc, bpdc] x4. Slst to first dc. fo (1 corner, 2 bpdc, 2 bphdc, 4 bpsc per side)
Colour white, start in any corner: [(dc3tog, ch 2, dc3tog, P, ch 2, dc3tog) in corner = corner made; ch 2, skip 2 st, sc in next st, ch 2, skip 2 st, (dc3tog, ch 2, dc3tog) into next st, ch 2, skip 2 st, sc, ch 2, sk 1 st] x4. Slst to first dc3tog. fo. (5 dc3tog, 1 P, 7 ch-2, 2 sc per side)
Colour light green, start at any corner: (2 bpsc around the middle dc3tog, pulling the P of round 6 in front of your work, ch 4, bpsc around next dc3tog, ch 4, bpsc around next dc3tog, ch 4, bpsc around next dc3tog, ch 4, bpsc around next dc3tog, ch 4) x4. Slst to first bpsc. fo. (6 bpsc, 5 ch-4 per side)
Work only in rd 6 ch spaces and pic, leave all rd 7 st behind your work. Start in any P: [(sc, ch 2, sc) into pic = corner made, (3 hdc into next ch space from rd 6) x7] x4. Slst to first sc. fo. (2 sc, 1 ch-2, 21 hdc per side)
Start in a rd 7 ch space after a corner: [3 sc into the ch space, 3 sc into next ch space, (tr, ch 1, tr, ch1) into next ch space; change to rd 8: fptr into hdc directly below (should be the middle one of the middle- side hdc group), P; back to rd 7, work in the same ch space you just worked before (ch 1, tr, ch 1, tr), 3 sc into next ch space, 3 sc into last ch space] x4. Slst to first sc. fo. (12 sc, 4 tr, 4 ch-1, 1 P, 1 fptr per side)
The P from rd 9 is the new corner. The corner will stay in this position from now on. Start in any P: [(2 dc, ch 2, 2 dc) in pic = corner made, dc into next 10 stitches, including chs; now change to rd 8: sc into ch-2 space (should be the old corner); in rd 9: dc into next 10 ch and st (don't skip a st from rd 9)] x4. Slst to first dc. fo. (1 corner, 24 dc, 1 sc per side)
Start in any corner: [(hdc, ch 2, hdc) = corner made, sk first (hidden) st, (hdc, ch 1, sk 1 st) x5, hdc cluster (= hdc, fpdc, hdc together) over the next 3 st (special st, see above), (ch 1, sk 1 st, hdc) x5, sk last st] x4. Slst to first hdc. fo. (1 corner, 12 hdc, 12 ch-1, 1 hdc cluster per side)
Start in hdc after a corner hdc (the second one of a side): {[sc, dc in sk rd 10 st (in front of rd 11 ch-1)] x4, ch 3, fphdc around rd 11 hdc cluster, ch 3, [dc in next sk rd 10 st (after a rd 10 hdc), sc] x4, ch 5} x4. Slst to first sc. fo. (8 sc, 8 dc, 2 ch-3, 1 ch-5, 1 fphdc per side)
Colour white, start in any corner: [ (dc3tog, ch 2, dc3tog, pic, ch 2, dc3tog) in corner around rd 11 and 12 ch spaces = corner made (same corner like in rd 6), ch 2; change to rd 11: (sc into ch-1 from rd 11 behind work, first one directly behind the rd 12 dc; ch 1, sk 1 st) x3, sc into ch-1; change to rd 11 and 12 together: dc3tog into ch space; ch 2, fpsc around rd 12 fphdc, ch 2; around rd 11 and 12 together: dc3tog; change to rd 11: (sc into next ch-1 behind work, ch 1, sk 1 st) x4, ch 1, sk 1 st] x4. Slst to first dc3tog. fo. (1 corner, 4 ch-2, 8 sc, 7 ch-1, 2 dc3tog, 1fpsc per side)
Colour light green, start in middle 3dctog of any corner: [(bpsc, ch 2, bpsc) around dc3tog = corner made; ch 2, bpsc around dc3tog, ch 3, sk two ch spaces, 3 dc into next ch space, ch 3, bpsc around next dc3tog, 2 dc into next two ch spaces of rd 12 and 13 together, bpsc around next dc3tog, ch 3, sk 1 ch space, 3 dc into next ch space, ch 3, bpsc around next dc3tog, ch 2] x4. Slst to first bpsc. fo. (1 corner, 2 ch-2, 4 ch-3, 4 bpsc, 10 dc per side)
Start in any corner ch space: [(hdc, ch 2, hdc) = corner made, 3 hdc (first into bpsc, others into ch space), sc into bpsc, ch 1; change to rd 12: dc3tog into the 3 rd 12 st directly below (should be dc, sc, dc), ch 1; back to rd 14: sc into the middle one of the 3 dc group, ch 1; back to rd 12: dc3tog into the 3 rd 12 st directly below (should be dc, sc, dc), ch1; back to rd 14: bpsc around next the 6 st in the middle, ch 1; into rd 12: dc3tog into the 3 st directly below (should be sc, dc, sc), ch 1; back to rd 14: sc into the middle one of the 3 dc group, ch 1; back to rd 12: dc3tog into the 3 st directly below (should be sc, dc, sc), ch 1; back to rd 14: sc into bpsc, 2 hdc into ch space, sk last bpsc] x4. Slst to first hdc. fo. (1 corner, 5 hdc, 4 sc, 6 bpsc, 4 dc3tog, 8 ch-1 spaces per side)
Stitches are worked into stitches and ch-1 spaces in this round. Start in any corner: [(2 dc, ch 2, 2 dc) = corner made, 12 dc, 6 hdc, 11 dc] x4. Slst to first dc. fo. (33 st per side)
Start in any corner: [(hdc, ch 2, hdc) = corner made; (ch 1, sk 1 st, hdc) x16, ch 1] x4. Slst to first hdc. fo. (35 st per side)
Start in any corner: [(sc, ch 2, sc) = corner made, (sc in next st, dc in sk st from rd 16 in front of rd 17 ch space) x17, sc] x4. Slst to first sc. fo. (37 st per side)
Start in any corner: [(sc, ch 2, sc) = corner made, 37 bpsc] x4. Slst to first sc. fo. (39 st per side)
That's it! Have fun! Copyright Feb 2022 by Loewenzahm

Round by round pictures
Notes to the pictures:
I am so sorry for that, but in the end I found some things that are not totally fine about the pictures. But as they are marginal, I think you will manage to work your square nevertheless without problems. So I decided to leave the pictures and just tell you where you have to take care:
Round 7: this picture shows the back side instead of the front side.
Round 18 and 19: these pictures don't match exactly at the corners.


