DIY- kostenlos- for free

Liebe Besucher*innen,
Alle auf diesem Blog gezeigten Dinge habe ich selbst entworfen. Ich teile meine Ideen gern mit Euch und freue mich über alle, die das ebenfalls tun!!!
Es ist für mich absolut selbstverständlich, die Ideen kostenlos mit Euch zu teilen.
Bitte respektiert die DIY- Idee!
Bitte verkauft keine Anleitungen von mir oder Dinge, die Ihr damit angefertigt habt. Und bitte respektiert mein Urheberrecht.
Natürlich dürft Ihr Dinge gerne nachbauen, nachhäkeln - selbst nutzen, weiterverschenken...
Danke! Eure Loewenzahm (Alexandra Zaminer)

Noch ein Wort zum Thema Werbung: Ich möchte mit meinem Blog auf keinen Fall für Produkte werben, sondern für Ideen! Manchmal kommt es aber vor, dass ich z.B. beim upcyclen Dinge benutze, wo noch ein Marken/ Produktname zu sehen ist oder beim Häkeln klar ist, von welchem Produkt die Idee stammt, das lässt sich nicht vermeiden. Bitte trefft in diesem Fall Eure eigenen wohlüberlegten Kaufentscheidungen!

Dear visitors,
Everything I show you on this blog is created by myself. I am happy to share this ideas with you for free.
I want also say thanks to everybody who shares own ideas for free as well!
This DIY idea is very important for me! Please respect this idea and don't sell anything you made from this ideas. And please don't declare this ideas of your own.
But feel free to give things made from these ideas as a gift or to use them for youself.
Thank you! Loewenzahm (Alexandra Zaminer)

Samstag, 26. November 2022

Little Pearl Dishcloth

 Hi,

 I love working dishcloths - such quick, easy and relaxing projects. And it's so much better for the environment to use handmade and washable dishcloths.

 This one is worked with 2 different types of dc yarn ( cotton or acrylic) used together and a 5mm hook. So it works up very quickly.


Abbreviations: ( using US terms)

ch - chain

dc - double crochet

sc - single crochet

st - stitch


That's what you do:

Ch 30

1. start in second chain from hook, work sc until end of the row (29 sc)

2. Ch 1 ( counts as stitch here and in all following rows), (sc, ch 1, sk 1 st)×13, 2 sc. Turn your work (29 st)

3. Ch 1, sc, (dc over the row 2 ch 1into the skipped row 1 st, sc)×13, sc into last st. Turn your work. (1 ch, 13 dc, 15 sc)

Repeat row 2 and 3 until the desired size. For me until row 29.

Work one row of sc.

For the border I finished one of the two yarns and worked two threads of the staying one at the same time. Then work one sc in each stitch/ row in a round. For the corners work (2 sc, ch 2, 2 sc). Finish off and sew in remaining ends.


Mittwoch, 20. Juli 2022

Marina 6"

 Marina


Here comes the next part of my actual 6“ series for you. All squares are named and inspired by some great female musicians. While designing the squares, I listened to their music. For me, music is connecting people around the world just like crocheting. You just can understand it everywhere. That's what I really love both of them. And if you like, you can hear to their songs while working the squares. We start with 'Marina' – named after the italian reggae singer Marina P. For a starter, I recommend you to listen to her album 'Soul Radio'.


Pattern uses U.S. Terms


Size: 6“ by using aran weight yarn.


Skill level: easy


Material:


  • yarn of your choice (aran weight for 12“)

    5 mm hook

  • scissors

  • yarn needle


Abbreviations (in alphabetic order):


  • bpdc – back post double crochet

  • bphdc – back post half double crochet

  • ch – chain

  • dc – double crochet

  • fo – fasten off

  • fpdc – front post double crochet

  • hdc – half double crochet

  • rd - round

  • sc – single crochet

  • slst – slip stitch

  • sk – skip

  • st – stitch

  • tr – treble crochet


Note: the first stitch of a round is a standing stitch, unless otherwise stated.


Colour placement: I took only different kinds of blue, grey and white to give the square a 'seaside' touch. Colour was changed every round. But that is definetely a no must. Feel free to place your colours however you like. There is much texture in it, so I am sure, even a single coulour version will look nice.


Pattern:


  1. Start with a magic ring. Work into it: 8 sc. Slst to first st. fo (8 sc)

  2. (bpdc, ch 2) x8. Slst to first st. fo (8 bpdc, 8 ch 2)

  3. (fpdc around bpdc, 3 dc into ch 2) x8. Slst to first st. fo, (8 fpdc, 24 dc)

  4. bphdc in each st around. Slst to first st. fo. (32 bphdc).

  5. This is the squaring round. All stitches are worked between the bphdc stitches. Start between any stitches: [(tr, ch 2, tr) between one st = corner made, 2 dc, hdc, sc, hdc, 2dc] x4. Slst to first st. fo. (8 dc, 4 hdc, 4 sc, 4 corners)

  6. [(2 dc, ch 2, 2 dc) into ch 2 = corner made, 1 dc between every st of a side (8 dc in total)] x4. Slst to first st. fo. (32 dc, 4 corners)

  7. [(2hdc, ch 2, 2 hdc) into ch 2 = corner made, 1 hdc between every st of a side (11 hdc in total ] x4. Slst to first st. fo (44 hdc, 4 corners).

  8. [(2 sc, ch 2, 2 sc) into ch 2 = corner made, 1 bpdc into around each st] x4. Slst to first st. fo (60 bpsc, 4 corners; final st count per side:19)

    Now weave in ends.


That's it! Have fun! Copyright May 2022 by Loewenzahm

Thanks to my testers Jamie (beaglegirl2) and Ellen (tickleelmo) for your help!

Samstag, 25. Juni 2022

Mar Azul

 Mar Azul


I have started a new 6“ series for you. All squares are named and inspired by some great female musicians. While designing the squares, I listened to their music. For me, music is connecting people around the world just like crocheting. You just can understand it everywhere. That's what I really love by both of them. And if you like, you can hear to their songs while working the squares. We start with 'Mar Azul' – named after a song of the great morna singer Cesaria Evora from the Capverdian Islands.

Pattern uses U.S. Terms


Size: 6“ by using aran weight yarn.


Skill level: easy


Material:


  • yarn of your choice (aran weight for 12“)

    5 mm hook

  • scissors

  • yarn needle


Abbreviations (in alphabetic order):


  • bpdc – back post double crochet

  • bphdc – back post half double crochet

  • ch – chain

  • dc – double crochet

  • fo – fasten off

  • fpdc – front post double crochet

  • fphdc – front post half double crochet

  • hdc – half double crochet

  • rd - round

  • sc – single crochet

  • slst – slip stitch

  • sk – skip

  • st – stitch


Note: the first stitch of a round is a standing stitch, unless otherwise stated.


Colour placement: I took only different kinds of blue, green and white to give the square a 'seaside' touch. Colour was changed every round (unless round one and two). But that is definetely no must. Feel free to place your colours however you like. There is much texture in it, so I am sure, even a single coulour version will look nice.


Pattern:

  1. Start with a magic ring. Work into it: 8 sc. Slst to first st. fo (8 sc)

  2. [(sc, ch 2, sc) into one st, sc] x4. Slst to first st. fo (12 sc, 4 ch 2)

  3. [ 3 sc into ch 2, sk 1 st, (2 dc, ch 2, 2 dc) into next st, sk 1 st] x4 Slst to first st. fo, (12 sc, 16 dc, 4 ch 2)

  4. [ 3 sc into ch 2, bphdc, bpdc, sk 1 st, (2 dc, ch 2, 2 dc) into next st (should be the sc), sk 1 st, bpdc, bphdc] x4. Slst to first st. fo. (12 sc, 8 bpdc, 8 bphdc, 16 dc, 4 ch 2). On this point, your square might cup a little bit. Don't worry. We will make it even in the next round.

  5. [(2 dc, ch 2, 2 dc) into ch 2 = corner made (corner will stay here from now on), don't skip hidden st, 4 bpdc, 1 fpdc around 3 sc together (creates a mini bobble), 4 bpdc] x4.Slst to first st. fo. (8 dc, 32 bpdc, 4 fpdc, 4 ch 2)

  6. [(2 hdc, ch 2, 2 hdc) into ch 2, don't skip hidden st, 6 hdc, fphdc around fpdc, 6 hdc] x4. Slst to first st. fo. (64 hdc, 4 fphdc, 4 ch 2)

  7. [(hdc, ch 2, hdc) into ch 2, don't skip hidden st, 8 bphdc, fphdc around fphdc, 8 bphdc] x4. Slst to first st. fo (72 bphdc, 4 fphdc, 4 ch 2). Final st count per side: 19

    Now weave in ends.


That's it! Have fun! Copyright May 2022 by Loewenzahm. Thanks to my testers Claire, Ellen and Jamie! It's wonderful that there are people all over the world helping each other in this never ending story of creativity!


Sonntag, 20. Februar 2022

Märzenbecher


First of all I have to say thanks to all the bamcal team to give me once more the opportunity to design a square for you!

Like last year, I will present you a square for March. I decided to choose again one of the early spring flowers for the center. Last year we had the daffodil. This year it is the spring snowflake ('Märzenbecher' in german, 'Leuconum vernum' is the latin botanical name). I love how they are searching their way to the last bit of snow and bringing back the power of nature in our lives. I tried to interpret that in this 12“ square. Hope you enjoy!


Pattern uses U.S. Terms


Size: 12“ by using aran weight yarn.


Skill level: intermediate


Material:

  • yarn of your choice (aran weight for 12“)

  • 5 mm hook

  • scissors

  • yarn needle


Abbreviations (in alphabetic order):


  • bpdc – back post double crochet

  • bphdc – back post half double crochet

  • bpsc – back post single crochet

  • ch – chain

  • dc – double crochet

  • dc3tog – dc 3 together

  • fo – fasten off

  • fpdc – front post double crochet

  • fphdc – front post half double crochet

  • fpsc – front post single crochet

  • fptr – front post treble crochet

  • hdc – half double crochet

  • rd - round

  • sc – single crochet

  • slst – slip stitch

  • sk – skip

  • st – stitch

  • tr – treble crochet


Special stitches:

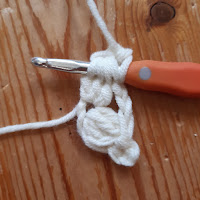
P: picot: ch 3, slst into the top front loops of the stitch directly under it (see picture):


hdc cluster (= hdc, fpdc, hdc together): yarn over, insert hook into next dc, yarn over, pull through (3 loops on the hook), yarn over, hook around sc (similar to the way of a fpdc), yarn over, pull through (5 loops on the hook), yarn over, pull through 2 loops (4 loops on the hook), yarn over, insert hook into next dc, yarn over, pull through (6 loops on the hook), yarn over, pull through all 6 loops.


Note: the first stitch of a round is a standing stitch, unless otherwise stated.


Colour placement: For the original spring snowflake effect, please work Rd 1,6 and 13 in white and Rd 2, 7 and 14 in light green. All other colour placements are up to you and your own creativity ;-)


Pattern:

  1. Colour: white; start with a magic ring. Work into it: (dc3tog, P, ch 2)x6, slst into first dc3tog (not into the P). fo

    (6 dc3tog, 6 P, 6 ch-2)

  2. Colour light green, start with two standing bpsc around any dc3tog, pulling the P of round 1 in front of your work; (ch 3, 2 bpsc around next dc3tog)x6, omitting the last 2 bpsc. Slst to first bpsc. fo.

    (12 bpsc, 6 ch-3)

  3. Work only around the ch-2 and ch-3 of rd 1 and 2 together. Sk all other st. Start in any ch space: [(hdc, ch 1, hdc, ch 1, hdc) into one ch space, ch 1]x6. Slst to first hdc. fo. (18 hdc, 18 ch-1)

  4. Work only in ch spaces: 2 sc in each ch-1 space. Slst to first sc. fo. (36 sc)

  5. This is a squaring round. Start with your first corner, work this corner in a sc directly above the central hdc of any 3 hdc group of rd 3: [(dc, ch 2, dc) = corner made, bpdc around next st, bphdc, 4 bpsc, bphdc, bpdc] x4. Slst to first dc. fo (1 corner, 2 bpdc, 2 bphdc, 4 bpsc per side)

  6. Colour white, start in any corner: [(dc3tog, ch 2, dc3tog, P, ch 2, dc3tog) in corner = corner made; ch 2, skip 2 st, sc in next st, ch 2, skip 2 st, (dc3tog, ch 2, dc3tog) into next st, ch 2, skip 2 st, sc, ch 2, sk 1 st] x4. Slst to first dc3tog. fo. (5 dc3tog, 1 P, 7 ch-2, 2 sc per side)

  7. Colour light green, start at any corner: (2 bpsc around the middle dc3tog, pulling the P of round 6 in front of your work, ch 4, bpsc around next dc3tog, ch 4, bpsc around next dc3tog, ch 4, bpsc around next dc3tog, ch 4, bpsc around next dc3tog, ch 4) x4. Slst to first bpsc. fo. (6 bpsc, 5 ch-4 per side)

  8. Work only in rd 6 ch spaces and pic, leave all rd 7 st behind your work. Start in any P: [(sc, ch 2, sc) into pic = corner made, (3 hdc into next ch space from rd 6) x7] x4. Slst to first sc. fo. (2 sc, 1 ch-2, 21 hdc per side)

  9. Start in a rd 7 ch space after a corner: [3 sc into the ch space, 3 sc into next ch space, (tr, ch 1, tr, ch1) into next ch space; change to rd 8: fptr into hdc directly below (should be the middle one of the middle- side hdc group), P; back to rd 7, work in the same ch space you just worked before (ch 1, tr, ch 1, tr), 3 sc into next ch space, 3 sc into last ch space] x4. Slst to first sc. fo. (12 sc, 4 tr, 4 ch-1, 1 P, 1 fptr per side)

  10. The P from rd 9 is the new corner. The corner will stay in this position from now on. Start in any P: [(2 dc, ch 2, 2 dc) in pic = corner made, dc into next 10 stitches, including chs; now change to rd 8: sc into ch-2 space (should be the old corner); in rd 9: dc into next 10 ch and st (don't skip a st from rd 9)] x4. Slst to first dc. fo. (1 corner, 24 dc, 1 sc per side)

  11. Start in any corner: [(hdc, ch 2, hdc) = corner made, sk first (hidden) st, (hdc, ch 1, sk 1 st) x5, hdc cluster (= hdc, fpdc, hdc together) over the next 3 st (special st, see above), (ch 1, sk 1 st, hdc) x5, sk last st] x4. Slst to first hdc. fo. (1 corner, 12 hdc, 12 ch-1, 1 hdc cluster per side)

  12. Start in hdc after a corner hdc (the second one of a side): {[sc, dc in sk rd 10 st (in front of rd 11 ch-1)] x4, ch 3, fphdc around rd 11 hdc cluster, ch 3, [dc in next sk rd 10 st (after a rd 10 hdc), sc] x4, ch 5} x4. Slst to first sc. fo. (8 sc, 8 dc, 2 ch-3, 1 ch-5, 1 fphdc per side)

  13. Colour white, start in any corner: [ (dc3tog, ch 2, dc3tog, pic, ch 2, dc3tog) in corner around rd 11 and 12 ch spaces = corner made (same corner like in rd 6), ch 2; change to rd 11: (sc into ch-1 from rd 11 behind work, first one directly behind the rd 12 dc; ch 1, sk 1 st) x3, sc into ch-1; change to rd 11 and 12 together: dc3tog into ch space; ch 2, fpsc around rd 12 fphdc, ch 2; around rd 11 and 12 together: dc3tog; change to rd 11: (sc into next ch-1 behind work, ch 1, sk 1 st) x4, ch 1, sk 1 st] x4. Slst to first dc3tog. fo. (1 corner, 4 ch-2, 8 sc, 7 ch-1, 2 dc3tog, 1fpsc per side)

  14. Colour light green, start in middle 3dctog of any corner: [(bpsc, ch 2, bpsc) around dc3tog = corner made; ch 2, bpsc around dc3tog, ch 3, sk two ch spaces, 3 dc into next ch space, ch 3, bpsc around next dc3tog, 2 dc into next two ch spaces of rd 12 and 13 together, bpsc around next dc3tog, ch 3, sk 1 ch space, 3 dc into next ch space, ch 3, bpsc around next dc3tog, ch 2] x4. Slst to first bpsc. fo. (1 corner, 2 ch-2, 4 ch-3, 4 bpsc, 10 dc per side)

  15. Start in any corner ch space: [(hdc, ch 2, hdc) = corner made, 3 hdc (first into bpsc, others into ch space), sc into bpsc, ch 1; change to rd 12: dc3tog into the 3 rd 12 st directly below (should be dc, sc, dc), ch 1; back to rd 14: sc into the middle one of the 3 dc group, ch 1; back to rd 12: dc3tog into the 3 rd 12 st directly below (should be dc, sc, dc), ch1; back to rd 14: bpsc around next the 6 st in the middle, ch 1; into rd 12: dc3tog into the 3 st directly below (should be sc, dc, sc), ch 1; back to rd 14: sc into the middle one of the 3 dc group, ch 1; back to rd 12: dc3tog into the 3 st directly below (should be sc, dc, sc), ch 1; back to rd 14: sc into bpsc, 2 hdc into ch space, sk last bpsc] x4. Slst to first hdc. fo. (1 corner, 5 hdc, 4 sc, 6 bpsc, 4 dc3tog, 8 ch-1 spaces per side)

  16. Stitches are worked into stitches and ch-1 spaces in this round. Start in any corner: [(2 dc, ch 2, 2 dc) = corner made, 12 dc, 6 hdc, 11 dc] x4. Slst to first dc. fo. (33 st per side)

  17. Start in any corner: [(hdc, ch 2, hdc) = corner made; (ch 1, sk 1 st, hdc) x16, ch 1] x4. Slst to first hdc. fo. (35 st per side)

  18. Start in any corner: [(sc, ch 2, sc) = corner made, (sc in next st, dc in sk st from rd 16 in front of rd 17 ch space) x17, sc] x4. Slst to first sc. fo. (37 st per side)

  19. Start in any corner: [(sc, ch 2, sc) = corner made, 37 bpsc] x4. Slst to first sc. fo. (39 st per side)


That's it! Have fun! Copyright Feb 2022 by Loewenzahm


Round by round pictures


Notes to the pictures:


I am so sorry for that, but in the end I found some things that are not totally fine about the pictures. But as they are marginal, I think you will manage to work your square nevertheless without problems. So I decided to leave the pictures and just tell you where you have to take care:

Round 7: this picture shows the back side instead of the front side.

Round 18 and 19: these pictures don't match exactly at the corners.


Mittwoch, 30. Juni 2021

Kokosnuss - Seifenschale

 Hey Ihr,

bei uns gibt es einen spanischen Supermarkt, der hat ganz hervorragendes Eis: in der Orange, in der Zitrone, in der Mango, in der Ananas und eben in der Kokusnuss. Kennt Ihr bestimmt auch, oder? Bei mir weckt dieses Eis Kindheitserinnerungen und inzwischen läuft es mir immer mal wieder über den Weg. auch wenn ich schon aus Kostengründen auf das vom Spanier schwöre.

Auf jeden Fall waren bei unserem letzten Besuch in eben diesem Supermarkt alle Sorten außer Kokosnuss alle. Das ist einerseits schade, denn mein Favorit sind definitiv die Zitrusfrüchte. Andererseits war Kokoseis auch seeeeehr lecker, und dann hatte ich noch diese tolle Schale in der Hand. Irgendwas muss sich damit doch machen lassen, oder?

Naja, beim ersten Eis ist mir noch Nichts eingefallen, aber irgendwann war unsere Flüssigseife alle (ich glaube, seit letztem Jahr ist unser Seifenverbrauch um ca. 1000 % gestiegen, geht Euch das auch so?). Und nachdem ich nur sehr sehr wenige Seifensorten vertrage und keine Lust hatte, schon wieder zu bestellen, und dann noch der Seifenspender echt nicht mehr schön aussah, fiel mir ein, dass ich noch aus dem letzten Urlaub so eine tolle handwerklich hergestellte Schafsmilchseife zu Hause hatte. Aber kein Seifenschälchen. Tja, und da war die Idee geboren - wie wäre es mit einer Seifenschale aus Kokosnuss?

Nachdem aber die Kokosnuss an sich etwas wackelig ist, brauchte ich noch einen Fuß. denn habe ich aus Paketschnur gehäkelt. war innerhalb von 15 Minuten fertig (die zeit zum Eis essen mit eingerechnet).


Und so geht das Ganze:

  1. Eis herauslöffeln und genießen (schön, wenn der tollste Arbeitsschritt gleich am Anfang kommt, oder?)
  2. Paketschnur und eine Häkelnadel 6 mm schnappen.
  3. 18 Luftmaschen anschlagen und mit einer Kettmasche zu einem Kreis schließen.
  4. Nun in der Runde häkeln, Jeweils eine feste Masche in die nächsten drei Maschen, dann zwei feste Maschen in eine Masche. Am Ende der Runde solltet ihr 24 Maschen gehäkelt haben. Mit einer Kettmasche schließen.
  5. In der nächsten Runde geht Ihr folgendermaßen vor: *(2 feste Maschen in die erste Masche, eine feste Masche in die nächste) noch zweimal wiederholen. 6 feste Maschen*. von *-* noch einmal wiederholen. Runde wieder mit einer Kettmasche schließen.
  6. Schnur abschneiden und vernähen. Kokosschale in den Ring stellen und die Seife hinein platzieren

Rainbow Eyes

Hey there, 

I think it's time for a new pattern in English. At the moment I am very busy in freeform- crochet, crochet streetart, yarnbombing, guerillacrochet and so on.

Most of the pieces I am working are freeform, but today I am working some rainbow colored eyes. They are easily made, so you can work some and join me with spreading some colors in your surrounding.


For the eyes you'll need:

  • leftover yarn (dk or aran weight ist fine, but you can take whatever you have) in white, black and all colors of the rainbow in two different shades (red, orange, yellow, green, light blue, dark blue, purple)
  • scissors
  • yarn needle
  • hook 4mm or corresponding to your yarn
Each eye is worked in one rainbow color. So you have 7 eyes in the end. Of course it is no problem if you make only one eye or use other colors... Feel free to make your own thing. Crochet is creativity!

Abbreviations:
  • slst - slip stitch
  • sc - single crochet
  • ch - chain
  • hdc - half double crochet
  • dc - double crochet
  • fo - fasten off
--> pattern is written in US terms.

Pattern:

work in rounds, start every round with a standig stitch and end with a slst (not mentioned in the pattern)

1. (black): 6 sc in magic ring. fo (6)

2. (lighter shade of your first rainbow color): 2 hdc in the back loop of each st. fo (12)

3. (white): in back loops only:* (dc, ch 2, dc) in first st, hdc in next st, 2 sc in next st, sc in next st, 2 sc in next st, hdc in next st*. Repeat once more from *-*. fo (18 st and 2x ch 2)

4. (darker shade of your first rainbow color): *(hdc, ch 2, hdc) into ch 2, sc all around until next ch 2*. Repeat one more time from *-*. fo (22 st and 2x ch 2)

Now sew in all rests of yarn. First eye is ready now. Repeat the pattern with the other 6 Eyes.


Sonntag, 27. Juni 2021

Badematte 'Warme Füße im Teich'

 Hey Ihr,

und hier kommt schon mein nächstes Freeform - Projekt. Meine megatolle, weiche, warme Badematte. Nie wieder kalte Füße beim Zähne putzen!!"

Was und wie ich die Matte gemacht habe, weiß ich nicht so genau. Irgenwie kleine Teile gehäkelt und aneinander gefügt. Mehr kann ich Euch nicht erklären, da war die letzten Monate einfach zu viel Nebel im Kopf ( nennt sich auch schwere Erschöpfungsdepression ). Aufjeden Fall bin ich dankbar und stolz, dass mir meine Kreativität einfach niemals abhanden kommt, egal wie wenig sonst in meinen Hirnzellen gerade funktioniert.

Zum Nachmachen ist es eh egal - darum geht es ja - einfach loslegen und schauen was draus wird. Ich behaupte mal, das könnt ihr auch, wenn ihr die Grundmaschen kennt. Das Allertollste am Freeform- Crochet ist ja das Motto: Jeder Fehler ist eine neue Gestaltungsmöglichkeit. Also dann, mal los.


Snow Beauty Shawl

This is my first english shawl pattern. I love working shawls and I love making patterns, so it's somehow a must to make more shawl patt...